The Vew Menu
In this page view mode change is explained. In writing paper, you use various options, but it is impossible to view all conditions of the documents on the same table. Therefore view mode change is necessary.
Now NisusWriter is open. You can see mysterious buttons at the bottom part of the screen and the right edge of the screen. Let's clear their usage from now on.
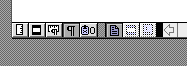
First, loot at the cotton at the upper-right. I'll explain you from the top,but before that if you click this you can see normal screen of NisusWriter, so check what difference it makes as you click these buttons. Of course, if it is available to use, do and see.
Click this button, you can tell your present page, present number of paragraphs and lines. Let's click botton('i'of italic style) The screen becomes like this. And the time is also displayed. You might not have chance to use this option often.
Viewing tool bar
The under button is to select whether view the Tool Bar or not. It'll be like this if you display the Tool Bar. How was it? Maybe it didn't change much from what you used to see. Then let's cancel it. Click ruler like icon once. It became somehow insipid screen, isn't it? Maybe it is usually you work with this Tool Bar on , but it is useful to use Tool Bar when you have several files at the same time and hard to see the screen as the screen monitor is too small to display all or you refer certain documents.
Viewing Graphic Tool Bar
A circled or buttons which are under the ruler like icon are ,as you imagined, these are to select viewing Tool Bar for Graphics. Who wants to design can view this button and it's very convenient. To cancel it, click the same button. It'll be normal display.
Viewing Voice record and Play Tool Bar
The further under you can see the sound button. You can play This is to play voice file added to Nisuswriter and to record vocie. On adding voice, click here.
Let's see the screen. If you click this button, the screen becomes like this.
Viewing Page layout
This is the last button. This is view mode to indentfy layout. By viewing this you can check the actual margins of height and width and by enlarging you can check to the detail. Let's click it. The screen becomes like this. If you want to inform moreabout this layout, click here.
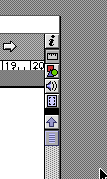
Let me explain the buttons on the under left side.
The leftest ruler like button is to view mesures on the left and upper side of the screen. For example, writing long a phrase, it scrools automatically. nd how far you are from the top.
The next button is to showing marks of Header and Footer. If you want to knwo more about Header and Footer, refer the next chapter "About Header and Footer". When you understand about them, click this button, you can tell the difference it made.
The next button is to show and quit Ruler Bar. Refer next chapter to learn more about it. If you don't have any knowledge about this button you can't understand what is happening.
The next button is to show and quit return mark. It is defenitely useful to have it.
The next button is for writing on the clipboard. The clipboardis, for example, useful when you are not sure to write something in the document, you can wrtie it on it, which save on clipboard for sometime and you can decide if you want to use it or not. People who have used LaTeX in UNIX may have heard sevral times "comment out", this is the same in Nisuswriter.You can save up to 10 points on clipboard. Advance them in writing long document. Without these mesures, you easily lose where you are.